Kubernetes is an open-source system for automating deployment, scaling, and
management of containerized applications. It groups containers that make up an
application into logical units for easy management and discovery.
It aims to provide a "platform for automating deployment, scaling, and operations
of application containers across clusters of hosts". It works with a range of container
tools, including Docker.
It eliminates many of the manual processes involved in deploying and scaling
containerized applications. In other words, you can cluster together groups of
hosts running Linux containers, and Kubernetes helps you easily and efficiently
manage those clusters. These clusters can span hosts across public, private,
or hybrid clouds.
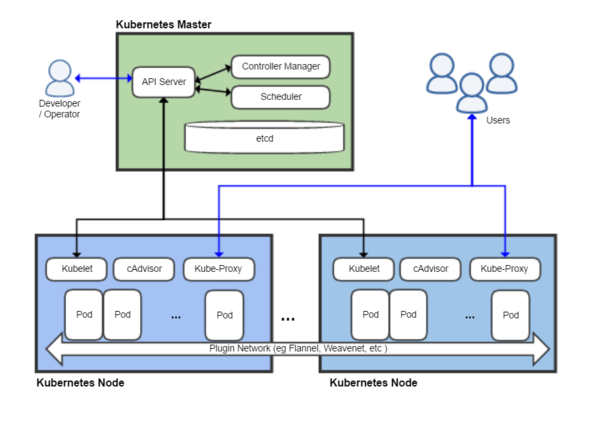
Architecture
Kubernetes follows the master-slave architecture. The components of Kubernetes
Kubernetes follows the master-slave architecture. The components of Kubernetes
can be divided into those that manage an individual node and those that are part
of the control plane.
Kubernetes control plane
The Kubernetes Master is the main controlling unit of the cluster that manages its
Kubernetes control plane
The Kubernetes Master is the main controlling unit of the cluster that manages its
workload and directs communication across the system. The Kubernetes control
plane consists of various components, each its own process, that can run both on
a single master node or on multiple masters supporting high-availability clusters.
The various components of Kubernetes control plane are as follows:
etcd
See also: Container Linux by CoreOS § Cluster infrastructure
etcd is a persistent, lightweight, distributed, key-value data store developed by
etcd
See also: Container Linux by CoreOS § Cluster infrastructure
etcd is a persistent, lightweight, distributed, key-value data store developed by
CoreOS that reliably stores the configuration data of the cluster, representing the
overall state of the cluster at any given point of time. Other components watch
for changes to this store to bring themselves into the desired state.
API server
The API server is a key component and serves the Kubernetes API using JSON
API server
The API server is a key component and serves the Kubernetes API using JSON
over HTTP, which provides both the internal and external interface to Kubernetes.
The API server processes and validates REST requests and updates state of the
API objects in etcd, thereby allowing clients to configure workloads and containers
across Worker nodes.
Scheduler
The scheduler is the pluggable component that selects which node an unscheduled
Scheduler
The scheduler is the pluggable component that selects which node an unscheduled
pod (the basic entity managed by the scheduler) should run on based on resource
availability. Scheduler tracks resource utilization on each node to ensure that workload
is not scheduled in excess of the available resources. For this purpose, the scheduler
must know the resource requirements, resource availability and a variety of other
user-provided constraints and policy directives such as quality-of-service, affinity/
anti-affinity requirements, data locality and so on. In essence, the scheduler’s role
is to match resource "supply" to workload "demand".
Controller manager
The controller manager is the process that the core Kubernetes controllers like
DaemonSet Controller and Replication Controller run in. The controllers communicate
with the API server to create, update and delete the resources they manage (pods,
service endpoints, etc.)
Kubernetes node
The Node, also known as Worker or Minion, is a machine where containers (workloads)
Kubernetes node
The Node, also known as Worker or Minion, is a machine where containers (workloads)
are deployed. Every node in the cluster must run the container runtime (such as Docker)
, as well as the below-mentioned components, for communication with master for
network configuration of these containers.
Kubelet
Kubelet is responsible for the running state of each node (that is, ensuring that all
Kubelet
Kubelet is responsible for the running state of each node (that is, ensuring that all
containers on the node are healthy). It takes care of starting, stopping, and
maintaining application containers (organized into pods) as directed by the control plane.
Kubelet monitors the state of a pod and if not in the desired state, the pod will be redeployed
Kubelet monitors the state of a pod and if not in the desired state, the pod will be redeployed
to the same node. The node status is relayed every few seconds via heartbeat messages
to the master. Once the master detects a node failure, the Replication Controller
observes this state change and launches pods on other healthy nodes.
Container
A container resides inside a Pod. The container is the lowest level of a micro-service
which holds the running application, the libraries and their dependencies. They are
exposed to the world through an external IP address.
Kube-proxy
The Kube-proxy is an implementation of a network proxy and a load balancer, and
Kube-proxy
The Kube-proxy is an implementation of a network proxy and a load balancer, and
it supports the service abstraction along with other networking operation. It is
responsible for routing traffic to the appropriate container based on IP and port number
of the incoming request.
cAdvisor
cAdvisor is an agent that monitors and gathers resource usage and performance
cAdvisor
cAdvisor is an agent that monitors and gathers resource usage and performance
metrics such as CPU, memory, file and network usage of containers on each node.
Install Kubernetes on RHEL
###########################
Install docker
Install docker
###################################
[root@ip-172-31-24-115 ~]# yum-config-manager --enable rhel-7-server-extras-rpms
Loaded plugins: amazon-id, rhui-lb
[root@ip-172-31-24-115 ~]# yum-config-manager --enable rhui-REGION-rhel-server-extras
[root@ip-172-31-24-115 ~]# yum -y install docker
[root@ip-172-31-26-35 ~]# systemctl restart docker && systemctl enable docker
Configure Kubernetes Master node
##################################
Adding repo
######################
[root@dhcppc5 yum.repos.d]# vim kubernetes.repo
[kubernetes]
name=Kubernetes
baseurl=https://packages.cloud.google.com/yum/repos/kubernetes-el7-x86_64
enabled=1
gpgcheck=1
repo_gpgcheck=1
gpgkey=https://packages.cloud.google.com/yum/doc/yum-key.gpg
https://packages.cloud.google.com/yum/doc/rpm-package-key.gpg
Install packages
####################################
[root@dhcppc5 yum.repos.d]# yum install -y kubelet kubeadm kubectl
Start kubelet service
################################
[root@dhcppc5 yum.repos.d]# systemctl enable kubelet && systemctl start kubelet
Disabling SELinux by running setenforce 0 is required to allow containers to
access the host filesystem, which is required by pod networks for example.
You have to do this until SELinux support is improved in the kubelet.
[root@dhcppc5 yum.repos.d]# setenforce 0
Some users on RHEL/CentOS 7 have reported issues with traffic being routed
incorrectly due to iptables being bypassed. You should ensure
net.bridge.bridge-nf-call-iptables is set to 1 in your sysctl config, e.g.
[root@dhcppc5 yum.repos.d]# vim /etc/sysctl.d/k8s.conf
net.bridge.bridge-nf-call-ip6tables = 1
net.bridge.bridge-nf-call-iptables = 1
net.bridge.bridge-nf-call-ip6tables = 1
net.bridge.bridge-nf-call-iptables = 1
[root@dhcppc5 yum.repos.d]# sysctl --system
Configure Kubernetes master node
#######################################
[root@ip-172-31-24-115 ~]# kubeadm init --apiserver-advertise-address=172.31.24.115
[init] Using Kubernetes version: v1.9.3
[init] Using Authorization modes: [Node RBAC]
[preflight] Running pre-flight checks.
[WARNING FileExisting-crictl]: crictl not found in system path
[certificates] Generated ca certificate and key.
[certificates] Generated apiserver certificate and key.
…………………………………………….
…………………………………………..
[addons] Applied essential addon: kube-dns
[addons] Applied essential addon: kube-proxy
Your Kubernetes master has initialized successfully!
To start using your cluster, you need to run the following as a regular user:
mkdir -p $HOME/.kube
sudo cp -i /etc/kubernetes/admin.conf $HOME/.kube/config
sudo chown $(id -u):$(id -g) $HOME/.kube/config
You should now deploy a pod network to the cluster.
Run "kubectl apply -f [podnetwork].yaml" with one of the options listed at:
https://kubernetes.io/docs/concepts/cluster-administration/addons/
You can now join any number of machines by running the following on each node
as root:
kubeadm join --token 152dc1.3f20f7d9a91b5174 172.31.24.115:6443
--discovery-token-ca-cert-hash
sha256:ea5820383fa3be2795fbe9f5f1c985a1617264b2275253a1aa06535b0831f9c1
Configure kubectl
##################################################
[ec2-user@ip-172-31-24-115 ~]$ mkdir -p $HOME/.kube
[ec2-user@ip-172-31-24-115 ~]$ sudo cp -i /etc/kubernetes/admin.conf $HOME/.kube/config
[ec2-user@ip-172-31-24-115 ~]$ sudo chown $(id -u):$(id -g) $HOME/.kube/config
[ec2-user@ip-172-31-24-115 ~]$ kubectl get nodes
NAME STATUS ROLES AGE VERSION
ip-172-31-24-115.ap-south-1.compute.internal NotReady master 5m v1.9.3
The master node is listed as NotReady because the cluster does not have a
Container Networking Interface (CNI). CNI is a spec for a of container based
network interface. I have used Calico. Alternatively, you can use Flannel or another CNI
Deploy the CNI to your cluster: Calico
################################
[ec2-user@ip-172-31-24-115 ~]$ kubectl apply -f https://docs.projectcalico.org/v2.6/
getting-started/kubernetes/installation/hosted/kubeadm/1.6/calico.yaml
configmap "calico-config" created
daemonset "calico-etcd" created
service "calico-etcd" created
daemonset "calico-node" created
deployment "calico-kube-controllers" created
deployment "calico-policy-controller" created
clusterrolebinding "calico-cni-plugin" created
clusterrole "calico-cni-plugin" created
serviceaccount "calico-cni-plugin" created
clusterrolebinding "calico-kube-controllers" created
clusterrole "calico-kube-controllers" created
serviceaccount "calico-kube-controllers" created
To ensure Calico was set up correctly, use kubectl get pods --all-namespaces
to view the pods created in the kube-system namespace
###################################################################
[ec2-user@ip-172-31-24-115 ~]$ kubectl get pods --all-namespaces
NAMESPACE NAME READY STATUS RESTARTS AGE
kube-system calico-etcd-26jmk 0/1 ContainerCreating 0 15s
kube-system calico-kube-controllers-d554689d5-xj49f 0/1 Pending 0 14s
kube-system calico-node-2th57 0/2 ContainerCreating 0 14s
kube-system etcd-ip-172-31-24-115.ap-south-1.compute.internal 1/1 Running 0 10m
kube-system kube-apiserver-ip-172-31-24-115.ap-south-1.compute.internal 1/1 Running 0 9m
kube-system kube-controller-manager-ip-172-31-24-115.ap-south-1.compute.internal 1/1 Running 0 9m
kube-system kube-dns-6f4fd4bdf-h6fvn 0/3 Pending 0 10m
kube-system kube-proxy-kvkdg 1/1 Running 0 10m
kube-system kube-scheduler-ip-172-31-24-115.ap-south-1.compute.internal 1/1 Running 0 9m
See the existing name spaces by running kubectl get namespaces
#########################################################
[ec2-user@ip-172-31-24-115 ~]$ kubectl get namespaces
NAME STATUS AGE
default Active 16m
kube-public Active 16m
kube-system Active 16m
Run kubectl get nodes again to see that the master node is now running properly
#################################################################
[ec2-user@ip-172-31-24-115 ~]$ kubectl get nodes
NAME STATUS ROLES AGE VERSION
ip-172-31-24-115.ap-south-1.compute.internal Ready master 18m v1.9.3
Configure Kubernetes Minion nodes
############################
Install docker
###################################
[root@ip-172-31-24-115 ~]# yum-config-manager --enable rhel-7-server-extras-rpms
Loaded plugins: amazon-id, rhui-lb
[root@ip-172-31-24-115 ~]# yum-config-manager --enable rhui-REGION-rhel-server-extras
[root@ip-172-31-24-115 ~]# yum -y install docker
[root@ip-172-31-26-35 ~]# systemctl restart docker && systemctl enable docker
Install Kubernetes
###########################
[root@ip-172-31-26-35 ~]# vim /etc/yum.repos.d/kubernetes.repo
[kubernetes]
name=kubernetes
baseurl=https://packages.cloud.google.com/yum/repos/kubernetes-el7-x86_64
enabled=1
gpgcheck=1
repo_gpgcheck=1
gpgkey=https://packages.cloud.google.com/yum/doc/yum-key.gpg
[root@ip-172-31-26-35 ~]# setenforce 0
[root@ip-172-31-26-35 ~]# iptables -F
[root@ip-172-31-26-35 ~]# yum install -y kubelet kubeadm kubectl
[root@ip-172-31-26-35 ~]# systemctl enable kubelet && systemctl start kubelet
Some users on RHEL/CentOS 7 have reported issues with traffic being
routed incorrectly due to iptables being bypassed. You should ensure
net.bridge.bridge-nf-call-iptables is set to 1 in your sysctl config, e.g.
############################################################
[root@ip-172-31-26-35 ~]# vim /etc/sysctl.d/k8s.conf
net.bridge.bridge-nf-call-ip6tables = 1
net.bridge.bridge-nf-call-iptables = 1
[root@ip-172-31-26-35 ~]# sysctl --system
Add Nodes to the Kubernetes Cluster
##################################################
Run kubeadm join with the kube-master hostname to add the first worker
#############################################################
[root@ip-172-31-26-35 ~]# kubeadm join --token
33118b.73dd931e77da30e0 172.31.24.115:6443 --discovery-token-ca-cert-
hash sha256:356c7ea677df894209a716a2520a0d95804
ac9068d142e1cf91d5b6de6e82e46
[preflight] Running pre-flight checks.
[WARNING FileExisting-crictl]: crictl not found in system path
[discovery] Trying to connect to API Server "172.31.24.115:6443"
[discovery] Created cluster-info discovery client, requesting info from "https://172.31.24.115:6443"
[discovery] Requesting info from "https://172.31.24.115:6443" again to validate TLS against the pinned public key
[discovery] Cluster info signature and contents are valid and TLS certificate validates against pinned roots,
will use API Server "172.31.24.115:6443"
[discovery] Successfully established connection with API Server "172.31.24.115:6443"
This node has joined the cluster:
* Certificate signing request was sent to master and a response
was received.
* The Kubelet was informed of the new secure connection details.
Run 'kubectl get nodes' on the master to see this node join the cluster.
Run kubeadm join with the kube-master hostname to add the second worker
###############################################################
[root@ip-172-31-16-138 ~]# kubeadm join --token
33118b.73dd931e77da30e0 172.31.24.115:6443 --discovery-token-ca-cert-
hash sha256:356c7ea677df894209a716a2520a0d95804
ac9068d142e1cf91d5b6de6e82e46
[preflight] Running pre-flight checks.
[WARNING FileExisting-crictl]: crictl not found in system path
[discovery] Trying to connect to API Server "172.31.24.115:6443"
[discovery] Created cluster-info discovery client, requesting info from "https://172.31.24.115:6443"
[discovery] Requesting info from "https://172.31.24.115:6443" again to validate TLS against the pinned public key
[discovery] Cluster info signature and contents are valid and TLS certificate validates against pinned roots,
will use API Server "172.31.24.115:6443"
[discovery] Successfully established connection with API Server "172.31.24.115:6443"
This node has joined the cluster:
* Certificate signing request was sent to master and a response
was received.
* The Kubelet was informed of the new secure connection details.
Run 'kubectl get nodes' on the master to see this node join the cluster.
Now go to the master node and use kubectl to check the slave nodes
###############################################################
[ec2-user@ip-172-31-24-115 ~]$ kubectl get nodes
NAME STATUS ROLES AGE VERSION
ip-172-31-16-138.ap-south-1.compute.internal Ready <none> 4m v1.9.3
ip-172-31-24-115.ap-south-1.compute.internal Ready master 56m v1.9.3
ip-172-31-26-35.ap-south-1.compute.internal Ready <none> 4m v1.9.3
Deploy Nginx on Kubernetes Cluster
##################################
A deployment is a logical reference to a pod or pods and their configurations.
From your master node kubectl create an nginx deployment
#######################################################
[ec2-user@ip-172-31-24-115 ~]$ kubectl create deployment nginx --image=nginx
deployment "nginx" created
This creates a deployment called nginx.
To list all the available deployments
##############################################
[ec2-user@ip-172-31-24-115 ~]$ kubectl get deployments
NAME DESIRED CURRENT UP-TO-DATE AVAILABLE AGE
nginx 1 1 1 1 2m
To view more information
################################
[ec2-user@ip-172-31-24-115 ~]$ kubectl describe deployment nginx
Name: nginx
Namespace: default
CreationTimestamp: Mon, 05 Mar 2018 12:28:35 +0000
Labels: app=nginx
Annotations: deployment.kubernetes.io/revision=1
Selector: app=nginx
Replicas: 1 desired | 1 updated | 1 total | 1 available | 0 unavailable
StrategyType: RollingUpdate
MinReadySeconds: 0
RollingUpdateStrategy: 1 max unavailable, 1 max surge
Pod Template:
Labels: app=nginx
Containers:
nginx:
Image: nginx
Port: <none>
Environment: <none>
Mounts: <none>
Volumes: <none>
Conditions:
Type Status Reason
---- ------ ------
Available True MinimumReplicasAvailable
OldReplicaSets: <none>
NewReplicaSet: nginx-7d7cbfc4f (1/1 replicas created)
Events:
Type Reason Age From Message
---- ------ ---- ---- -------
Normal ScalingReplicaSet 3m deployment-controller
Scaled up replica set nginx-7d7cbfc4f to 1
Make the NGINX container accessible via the internet by creates a public
facing service on the host for the NGINX deployment. As this is a nodeport
deployment, kubernetes will assign this service a port on the host machine in
the 32000+ range.
##################################################################
[ec2-user@ip-172-31-24-115 ~]$ kubectl create service nodeport nginx --tcp=80:80
service "nginx" created
To get the current services
###########################
[ec2-user@ip-172-31-24-115 ~]$ kubectl get svc
NAME TYPE CLUSTER-IP EXTERNAL-IP PORT(S) AGE
kubernetes ClusterIP 10.96.0.1 <none> 443/TCP 1h
nginx NodePort 10.109.137.39 <none> 80:32532/TCP 1m
Verify that the NGINX deployment is successful by using curl on the slave node
#####################################################################
[ec2-user@ip-172-31-24-115 ~]$ curl ip-172-31-26-35.ap-south-1.compute.internal:32532
<!DOCTYPE html>
<html>
<head>
<title>Welcome to nginx!</title>
<style>
body {
width: 35em;
margin: 0 auto;
font-family: Tahoma, Verdana, Arial, sans-serif;
}
</style>
</head>
<body>
<h1>Welcome to nginx!</h1>
<p>If you see this page, the nginx web server is successfully installed and
working. Further configuration is required.</p>
<p>For online documentation and support please refer to
<a href="http://nginx.org/">nginx.org</a>.<br/>
Commercial support is available at
<a href="http://nginx.com/">nginx.com</a>.</p>
<p><em>Thank you for using nginx.</em></p>
</body>
</html>


0 Comments